
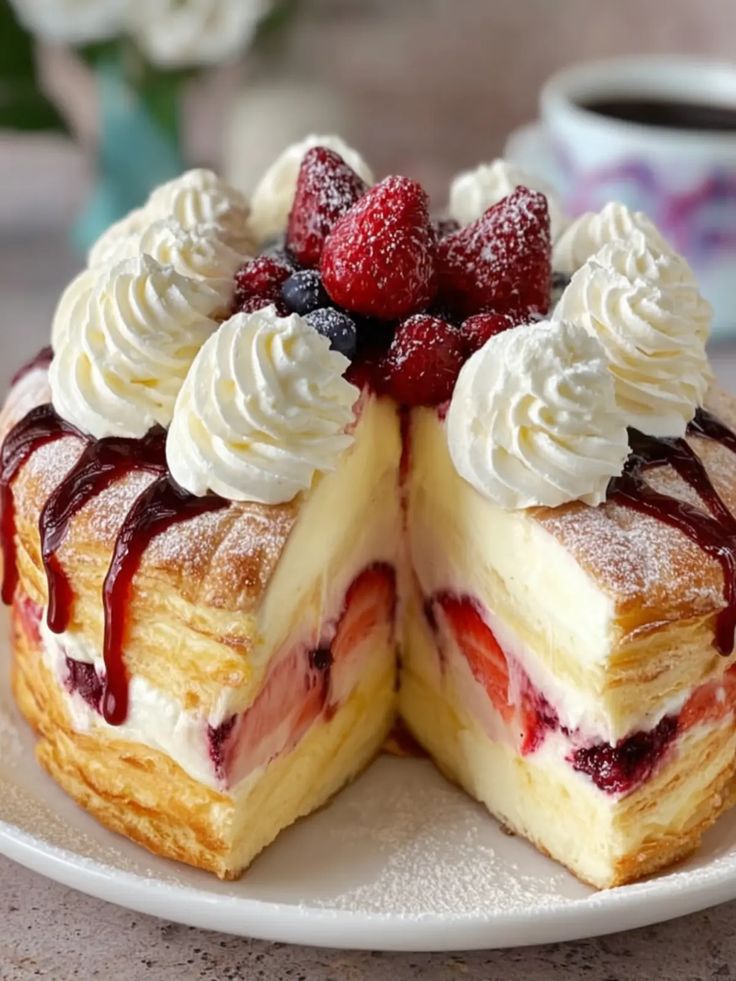
If you are looking to bake a show-stopping, elegant dessert for your next afternoon tea or family gathering, this Layered Berry Puff Pastry Cake is the ultimate recipe. Inspired by the classic French Mille-Feuille, it features towering layers of extra-flaky, golden-brown puff pastry sheets nested between a silky vanilla cream filling and a rich, glossy layer of mixed berry jam.
Crowned with a beautiful rosette of whipped cream and loaded with fresh plump raspberries and blueberries, this dessert offers an incredible harmony of textures. The secret to this recipe is the pre-scored top pastry layer, which allows your guests to slice through the cake effortlessly without squishing the velvety cream out!
Prep time, Cook time, & Servings
- Prep Time: 40 minutes
- Cook Time: 20 minutes
- Total Time: 1 hour
- Servings: 8-10 elegant slices
Ingredients
The Crispy Puff Pastry Layers:
- Puff Pastry Sheets: 2 large sheets (store-bought or homemade, defrosted)
- Powdered Sugar: 1/4 cup (for caramelizing during baking and the final dusting)
The Stable Vanilla Cream Filling (Crème Diplomat):
- Whole Milk: 1.5 cups
- Egg Yolks: 4 large yolks
- Granulated Sugar: 1/2 cup
- Cornstarch: 3 tbsp (vital for structural stability)
- Pure Vanilla Extract: 1.5 tsp
- Heavy Whipping Cream: 1 cup (ice-cold, whipped to stiff peaks)
The Fruity Filling & Fresh Crown Garnish:
- Mixed Berry or Raspberry Jam: 1 cup of high-quality, thick fruit jam
- Fresh Raspberries: 1/2 cup (plump and fresh)
- Fresh Blueberries: 1/2 cup
- Fresh Mint Leaves: A few sprigs for color contrast
Step-by-Step Instructions
1. Bake and Shape the Pastry Sheets
- Preheat your oven to 400°F (200°C). Line two large baking sheets with parchment paper.
- Cut the circles: Roll out your two sheets of puff pastry. Use a 9-inch round cake pan as a template to cut out three identical 9-inch circles from the dough. Place them onto the lined baking sheets.
- The Weight Strategy (For Mille-Feuille Texture): To prevent the pastry from puffing up into giant hollow balls, prick the entire surface of the dough circles heavily with a fork. Place another sheet of parchment paper directly over the dough circles, and weigh them down by stacking a second empty baking sheet right on top.
- Bake: Bake with the weight on for 15 minutes. Remove the top baking sheet and top parchment paper, dust the pastry circles lightly with powdered sugar, and return to the oven uncovered for 5 more minutes until they are deeply golden-brown and caramelized. Let them cool completely.
- Pre-score the top: Take the prettiest pastry circle (which will be your top crust). Using a sharp serrated knife, gently saw and cut it completely into equal fan-like wedges (slices) ahead of time. This is the ultimate professional secret that prevents the cake from collapsing when served!
2. Cook the Luxurious Custard Base
- Whisk: In a medium bowl, whisk the egg yolks, granulated sugar, and cornstarch together until pale and thick.
- Simmer: Heat the milk in a saucepan over medium heat until it just begins to simmer. Slowly stream the hot milk into the egg mixture while whisking continuously to temper the eggs.
- Thicken: Pour the mixture back into the saucepan. Cook over medium-low heat, stirring constantly with a whisk, until it bubbles and thickens into a dense custard. Stir in the vanilla extract. Transfer to a bowl, press plastic wrap directly against the surface of the cream, and chill in the fridge for 30 minutes.
- Lighten: Once the custard is cold, whisk it briefly to loosen it up. Gently fold your whipped heavy cream into the cold custard using a rubber spatula until it forms a perfectly stable, velvety, and fluffy cream filling. Transfer it into a pastry bag.
3. Assemble the Elegant Layers
- Base Layer: Place your first solid baked pastry circle onto your white serving platter. Pipe half of the white vanilla cream uniformly across the surface.
- The Berry Infusion: Carefully spoon the thick mixed berry jam directly over the cream layer, smoothing it gently into an even red glaze.
- Second Pastry Layer: Place your second solid pastry circle right on top of the jam. Pipe the remaining vanilla cream in beautiful thick dollops across this layer.
- The Pre-Cut Lid: Arrange the pre-sliced top pastry wedges tightly back together into a full circle right over the final cream layer.
4. Garnish and Serve
- Crown: Pipe a massive, fluffy rosette of fresh whipped cream right into the center peak of the cake.
- Fruit Load: Pile the fresh red raspberries and dusty blue blueberries directly into and around the whipped cream rosette. Finish with a fresh mint leaf.
- Dust: Give the entire top of the cake a generous, final snowing of powdered sugar. Serve immediately or chill for up to two hours before slicing!
Chef’s Tips for Success
- Why Pre-Scoring is Mandatory: If you try to cut a whole layered puff pastry cake with a knife after assembly, the pressure will squeeze the soft cream filling completely out of the sides, ruining your visual layout. Slicing the top sheet into wedges beforehand allows your serving knife to glide straight through the cream without any resistance.
- Keep it Stiff: Do not cut down on the cornstarch in the custard base. The cream needs a high structural stability to support the heavy weight of the top caramelized pastry sheets.
- The Crispy Timeline: Puff pastry cakes absorb moisture from creams and jams over time. For the absolute maximum “crrr-unch” texturized bite shown in the video prompt, assemble this cake within 2 to 3 hours of serving your guests.